

The importance of conversion tracking
There are few reasons you should use a tracker for your campaigns:
- The most obvious you will know from where the conversion came - site name or site ID, spot (widget).
- Some additional data like - user’s browser, browser’s language, OS, OS version, etc.
- If you bid CPC you will know your traffic price in every single moment. It is a little harder to track it properly with CPM price, so you need to update it manually in most cases.
- You can make blacklists with ease and block the spots which don’t produce conversions.
- You can use your tracker for some advanced techniques like dayparting
- If you are running different ad formats in one campaign you can track their performance with no problem.
- Same thing with the traffic types. You can run in the same time classic push and in-page push notifications and see how they are performed separately in your tracker.
- For push notifications, you also can track the user’s subscription age.
Key terms
Let’s clarify some terms that we will use:
- S2S postback - This is the signal from the advertiser's servers via your tracker’s server back to the Pushground (traffic source) servers signifying that there has been a conversion (sale or lead). In this case, you are using your tracker as a “bridge” between the traffic source and the affiliate network. This method is independent of the user’s browser.
- Tracking Tokens (Macros) - Marcos or tracking tokens are a form of HTTP protocol on a URL that allows you to track everything from the click id to the name of the device that clicked on your ad. By adding them to your URL it allows you to track that specific attribute. Before we talk about macros you must understand parameters and values. A parameter is a dimension or label for what you want to track like a country or source. Then it is defined by the value following. The macro holds the place of the value but then dynamically changes to reflect the right value for the parameter. More info about tracking and a full list with available macros you will find here.
But let’s end with the boring theory and let’s continue with some practice!
How to set up your tracker
Connect your traffic source
I will use the Keitaro tracker for our test purposes - it’s one of the best self-hosted trackers.
Keitaro is already installed on my server, that’s why we can start with the postback setup.
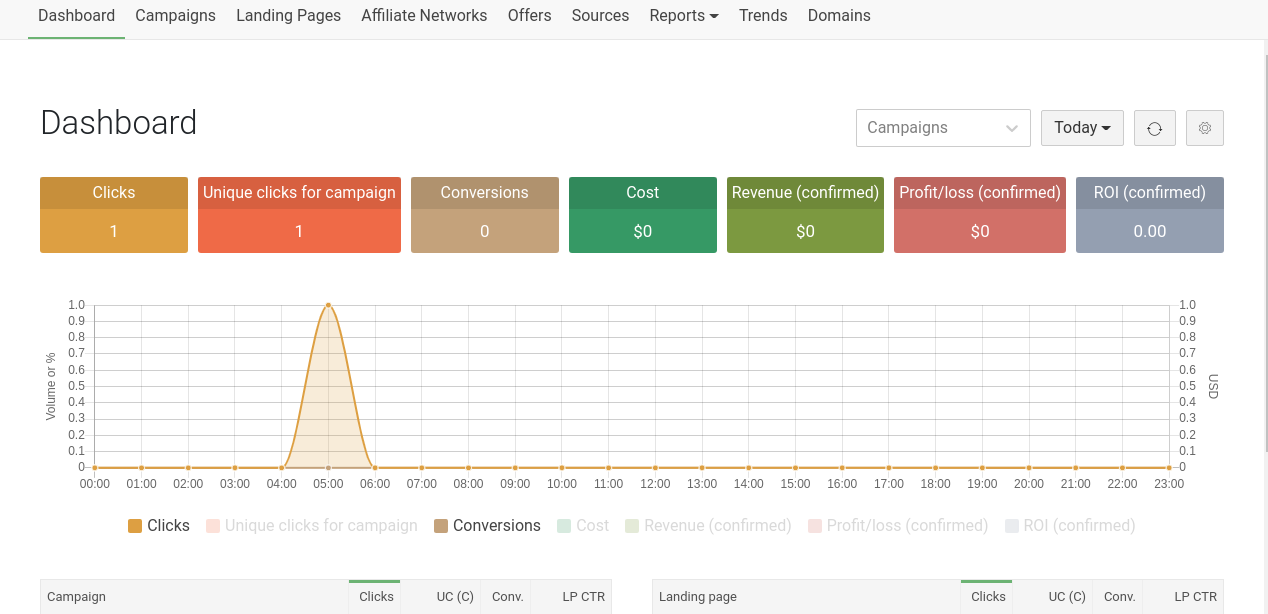
This is my tracker’s main page. More or less you will see the same in every tracker on the market.
First, let’s add the traffic source. In our case - Pushground.

To do this you need to click on “Sources”, then click on the “Create” button.
From “Template name” you can choose Pushground.com and the name and the S2S postback will appear automatically.
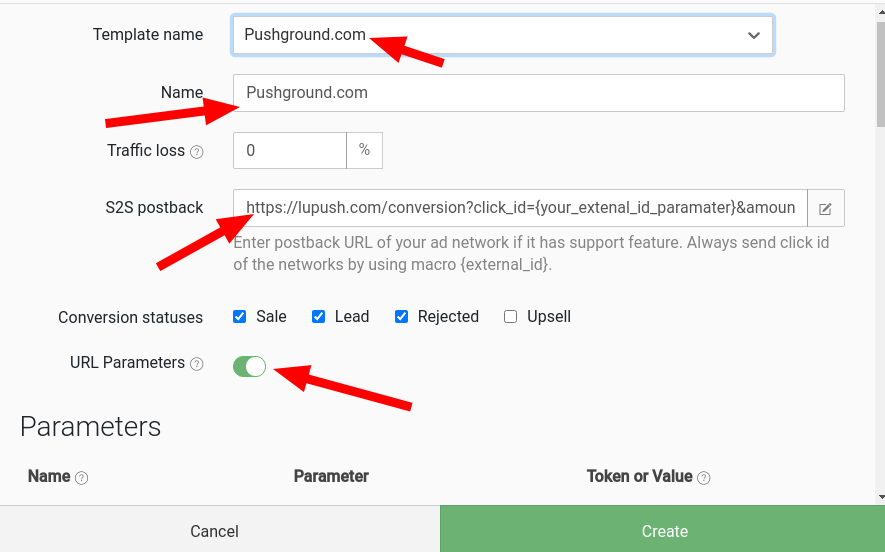
You can leave ‘traffic loss” at 0 %. Now let’s check the S2S postback with Pushground because sometimes trackers don’t update their links.
Go to your Pushground’s dashboard and click on “Create Campaign”
You will see this:
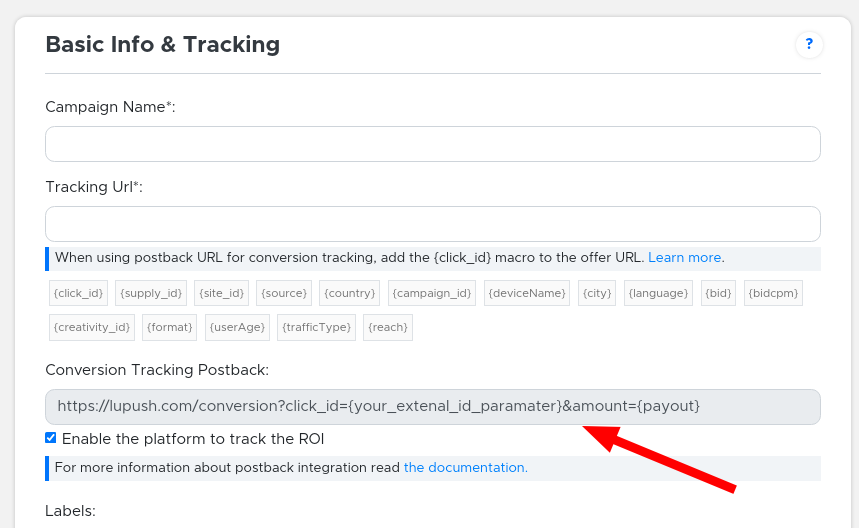
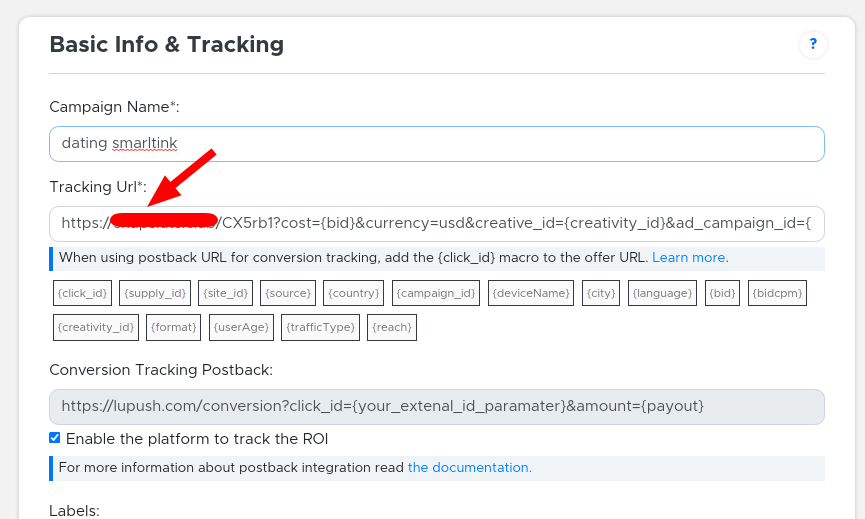
As you can see the “Conversion Tracking Postback” domain and link are the same as the ones in Keitaro, so we are ok.
According to their documentation, they are using ready-made templates so we don’t need to change anything here.
If you don't have a template for Pushground in your tracker then just can copy the link from "Conversion Tracking Postback" , paste it in your tracker's S2S field and then replace the {your_extenal_id_paramater} with your external_id (usually is something like {externalId}), and for amount={payout} use your token for the payout (which in almost all cases is {payout}).
The final S2S will be: https://lupush.com/conversion?click_id={externalId}&amount={payout}.
You can use the same method for every tracker on the market. Don’t forget to check your tracker’s tokens because sometimes they are different.
Here you can read some additional info and S2S configuration in Pushground
Now let’s continue with our setup - we need to check the “Parameters” and the tracking tokens.
In Keitaro, still in “Create Source” just scroll down till you see this:
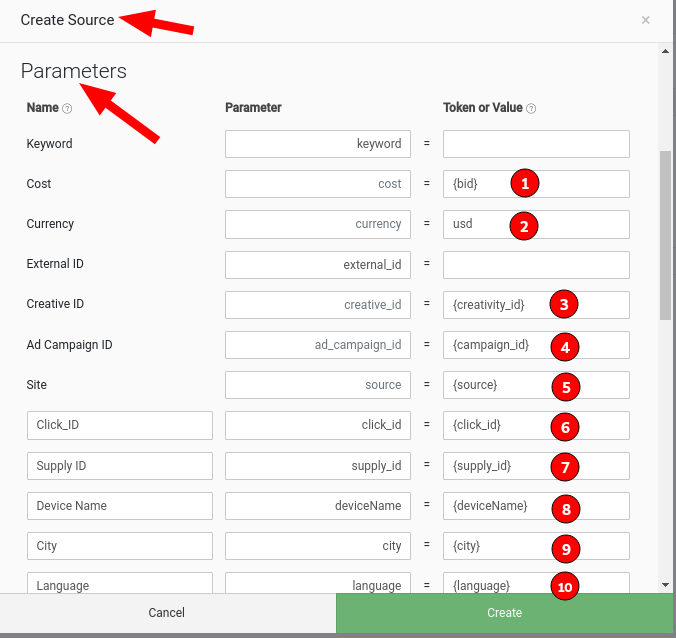
We already have a lot of tracking tokens entered. We can double-check with Pushground again:

From what I can see four tokens are missing: {reach}, {site_id}, {format} and {TafficType}. I want to add them so I will edit the Pushground’s template in Keitaro:
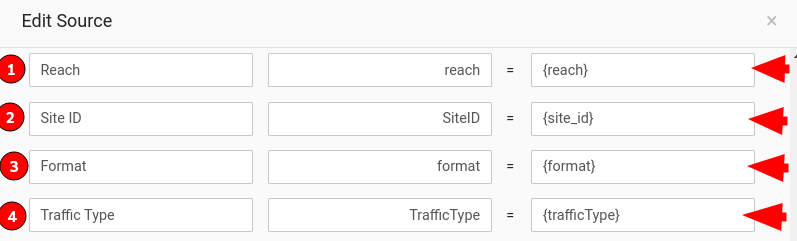
For the left column “Name” you can use whatever name you want, just be sure there is a sense for you. For the middle column “Parameter” you can use only letters without any spaces between them. For the right column “Token or Value” please paste the suitable token from Pushground. When you are ready just click “Save” and that’s all.
You can use the same system for every traffic source. Just remember a few things:
- Every traffic source has unique tracking tokens
- Conversion tracking postback also will be different.
Connecting the affiliate network
After we connected the traffic source, let’s connect the Affiliate Network too. I recommend you to start with one of the most reputable - MyLead.
Again to go back to Keitaro’s dashboard then select the “Affiliate Networks” tab and click on the “Create” button:

You will see this:

From “Template name” choose Mylead.global. “Name” you can change to whatever you want. “Offer Parameters” and “Postback URL” do not touch (for security reasons I’m hiding my domain name, but it’s not important)! After you copy the whole Postback URL you need to open Mylead’s main page.
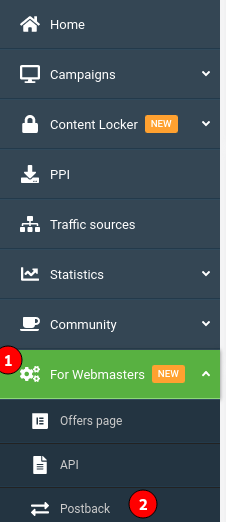
From the left choose “For Webmasters” and then “Postback”. After you do it, you will see a green CTA button “Add A New Postback URL”. Click on it and paste the Postback URL that you copy from your tracker to the field “Postback URL” and save.

Connect the offer with our tracker:
Go to MyLead’s panel, click on “Campaigns”, then choose “List Of Campaigns”

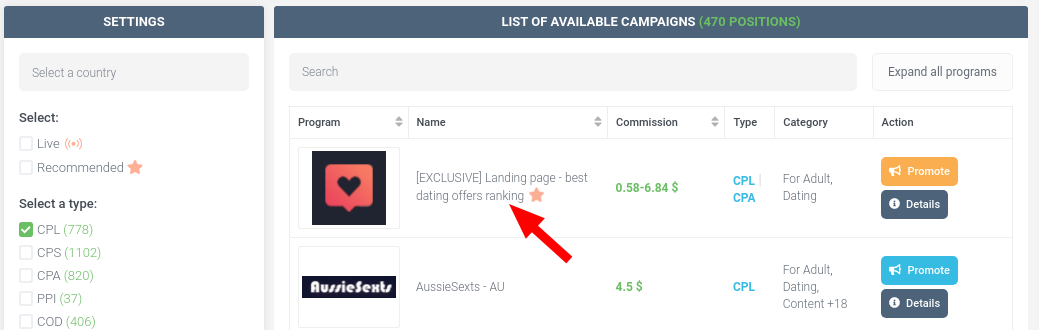
You will see a big list with over 3000 offers. Choose the vertical and offer or just ask your affiliate manager what is good to run now and click on the desired offer.
I’m choosing the dating SmartLink offer because it works great with Pushground’s adult push traffic:
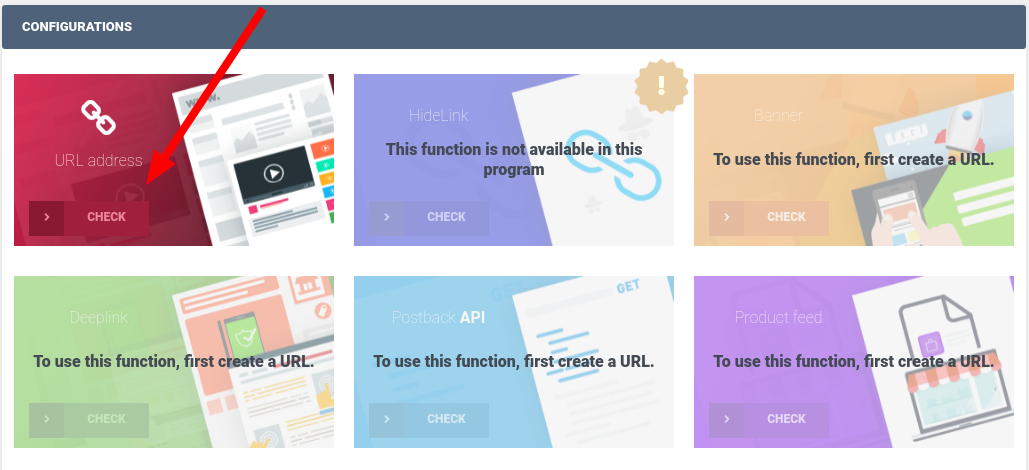
Now you need to click on “URL Address: to create your unique link with which you will promote your offer:
Before you receive your offer’s URL you will something similar. Please be sure you what kind of traffic is prohibited and In the empty field (1) you can add a short description of what traffic you will use and then click on the agreement button.

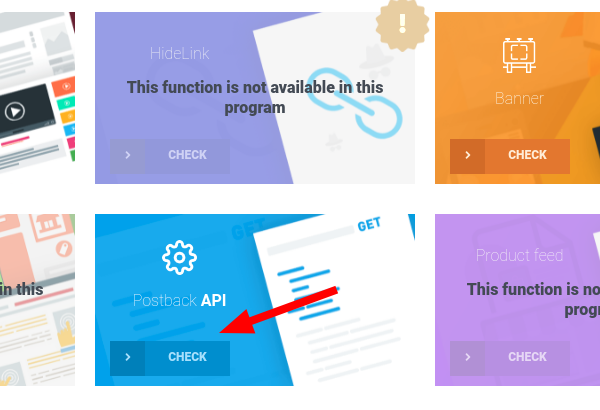
You need to wait for the approval and after you have it return to List of Programs->Configuration and click on the blue “Postback API” rectangle:
You will see this window and you can paste your Postback URL:
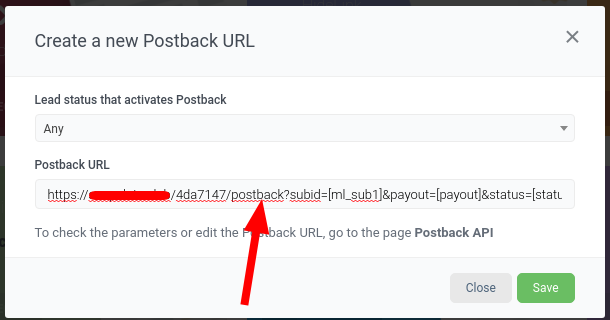
Save this, close the windows and scroll down to “your configurations” where you will see the offer’s link:

Copy your offer’s link, return to your tracker and open the “Offers” tab and “Create”

You will see “Create Offer” window. Name your offer, choose MyLead from “Affiliate Network”, and paste your offer’s URL in the “URL” field and after it, you need to add this: ?ml_sub1={subid} - ml_sub1 is the part from Mylead network which is always the same, and {subid} is the parameter from the Keitaro tracker and it may be different if you are with another tracker (for example {clickid}).
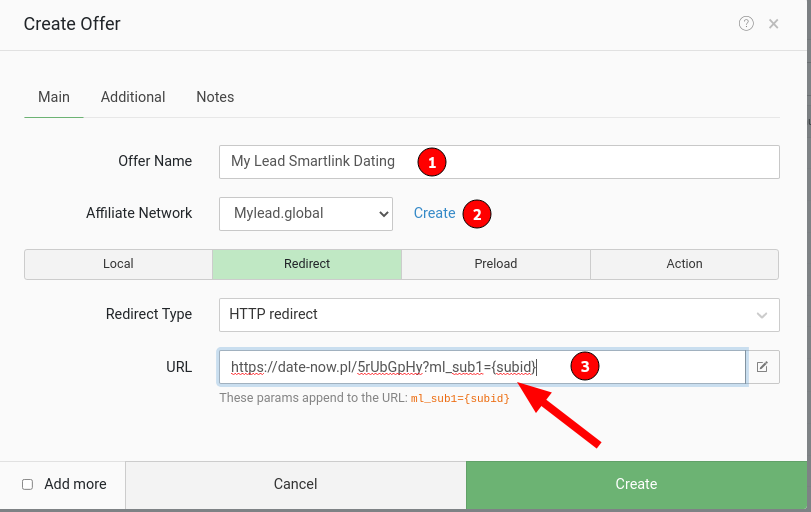
Click “Create” and you are done. We are almost ready with our setup.
The only thing left is to create a campaign and start sending traffic to this offer.
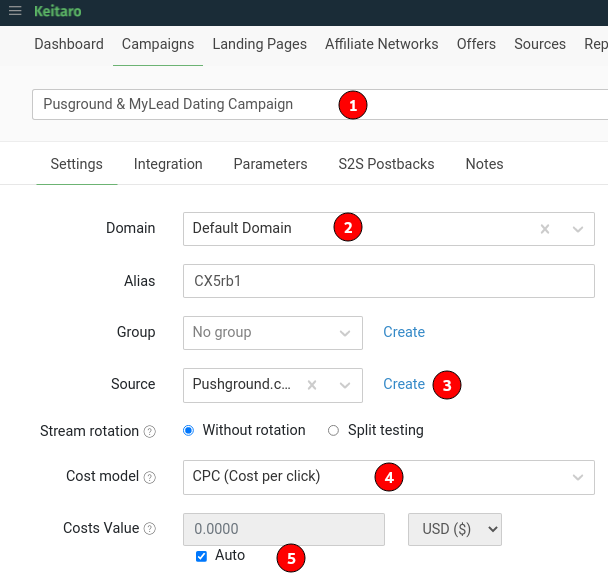
Go to “Campaigns” and click on “Create”:

First, you need to name your campaign (step 1). Then choose a domain (step 2). Step 3 - select your traffic source. In this case Pushground, the cost model is CPC because in Pushground you can pay only CPC price (step 4) and check “Auto” at Costs Value
When you finish with this, please transfer your attention to the right side of your screen and click on “Create Stream” - here you will add your landing pages and offer in your campaign.

Go to “Schema” if you use your landing pages, click on “Add Landing Pages”, otherwise please skip this step and add your offer. In this example we use SmartLink with already integrated prelanding pages, so we will add our SmartLink dating offer from MyLead directly from “Add Offers” (step 3) and finally hit “Apply”
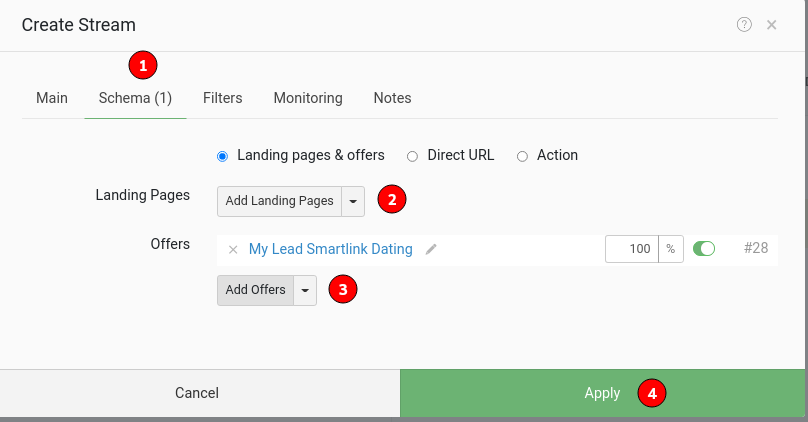
Click on “Apply”, then on “Create” and then copy the campaign link:

Now you can start creating your campaign on the traffic source level. Login in Pushground and start a new campaign. Name your campaign, and in the “tracking Url” field paste the campaign link you have copied from Keitaro.
Now everything is fully connected - you have your traffic source connected with your tracker, the affiliate network is connected with the tracker too, so every conversion will pass from the affiliate network to the source using the tracker.
I know it looks hard in the beginning but when you have some experience you will be able to do this for 3-4 minutes maximum.
It’s time to make some money :)
Knowing how to properly track your conversions is a crucial step in every campaign so we are going through everything step by step in this beginners guide.
.png)
.png)