

Today, let’s find out how to create a winning campaign from the very beginning. Even if you’re not new here, take a look at these insights.
If you want to have a successful campaign, you’ll need to go beyond just the creatives and basic setup, and address key setup tools that will make a big difference in your results.
We know this can be intimidating, especially if you’re running on a low starting budget. But no matter how much you’re going to spend, the important thing is making sure you make the most of your campaign.
1. Start by reaching out to your personal Account Manager
Don’t worry, they don’t bite! Our account managers have years of experience and know-how to help you start any campaign. Their sole purpose is to help you make money! So don’t be afraid to ask them anything, and the best part is that 100% of our clients have this advantage ;)
Start the conversation by simply clicking the blue icon at the bottom right corner of the screen.
2. Basic info & Setup Tracking URL
Use the campaign name and labels to easily identify your campaign later on. Your tracking URL should look something like this:
http://advertiser.com/?your_paramater={click_id}
For more info about setting up your tracking URL see S2S Postback Configuration & What are Postbacks.
The s2s postback not only allows you to track conversions but it is also a basic tool to identify and target your audiences later on. Make sure to check Audiences in the left side menu.
ProTip: use pre landers on your campaigns for a better performance. For a better understanding of how to set them up, check this article.


3. Format Choice
Firstly, let’s choose your format: push, web push, calendar or pop.
4. Basic Targeting
Pushground is proud to have one of the most advanced targeting systems on the market. Use targeting to find the best niche for your ads. It can be hard to know how to target your first campaign so let's go through this one by one.
Country: We recommend for most beginners to start with tier 2 and 3 countries because the traffic there is often a lot cheaper and it allows for a more forgiving learning curve. Learn more about the different country tiers in this article.
Carrier: only works when choosing mobile network type. For the first campaign it’s best to target all and optimize later once you start seeing trends in your results, based on data.
Network Type: Normally, Wifi is better for targeting Desktop and tablet and Mobile is better for smartphones. Be sure to also check what type of traffic your offer is open to. Some offers are not open to wifi, or will simply not work. In case of doubt, we recommend targeting all at the beginning.
Device: We recommend that you focus on either smartphones or desktop and Tablets. Note that the average CPC is normally cheaper for smartphones and more expensive for computers and tablets.
ProTip: our account managers suggest split testing the campaigns when you’re running the same offer on different device types. Both the performance and the CPC prices can vary.
OS (Operating System): We offer Android, Desktop, iOS and Windows Phone for Smartphones. For Desktop devices, we offer Windows, Mac OS X, Linux and ChromeOS.
Browsers: it’s also possible to target your traffic by browser. Take note that some offers are only indicated for specific browsers, in which case you’ll have to indicate it. Otherwise, we recommend leaving this option open to all.
5. Advanced Targeting
Advanced targeting helps you optimize later on. After running your offer for the first time, take a look at the trends and note all zones in which you think traffic can be potentially more profitable. Advanced Targeting it’s good for testing and scaling your campaigns, but be careful because it can narrow your campaign reach.
We recommend only using them when it's absolutely necessary (because it’s a local offer, because the offer is specified for some Android/Windows/iOS version only, etc).
6. Targeting Audiences
Activating the Audiences feature will allow you to target or exclude audiences of your choice, for example, users who already engaged with your website before.
7. Traffic Type
Both mainstream and adult traffic are available in Pushground. You are free to activate both of them, or just one. Only in the case that you’re running a Dating Adult campaign (with aggressive creatives, text, and landing pages), it will be mandatory for you to choose only adult traffic, which will be suitable for your offer.
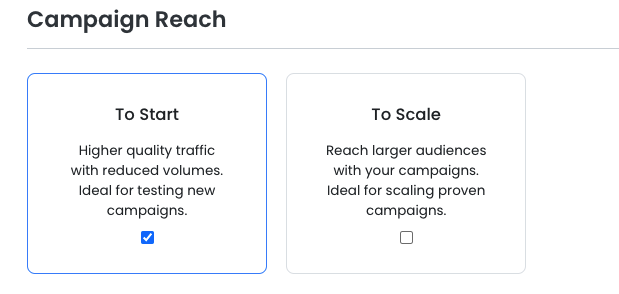
8. Campaign Reach
Here you’ll find two types of traffic: To Start and To scale.
We strongly suggest you target only To Start traffic at the beginning, as the volumes are more than enough and the performance is a little better than To Scale.
To Scale is meant to be used once you fully understand your offer, and you have found the good targeting options for it. It is useful for scaling volumes & therefore profits.
9. User Freshness
User freshness is measured by how long the user has been a subscriber to push notifications. In general, fresher users have the highest engagement rates and perform better, but they’re also a bit more expensive and noticeably fewer. They have seen less push ads so they’re more likely to click on them. Take a look at the User Freshness Index here.
ProTip: for starting, we recommend targeting from 0h to 14 days. If you feel like you need higher volumes or you want to scale your traffic, then add more user freshness groups - but for starting this should be enough. Normally, lower User Freshness means more expensive traffic, but the users have seen fewer push ads and are more likely to click on one.

10. IP Frequency / Capping
You can choose how many times the system can deliver your ad in a 24h time period. Which means that if you choose 3:24, the system will send your ads a maximum of 3 times in 24h. If you choose none, there will be no limitation.
Take into consideration that choosing 1:24 can narrow your traffic possibilities a lot, and choosing none can boost your volumes.
11. Whitelists and Blacklists
Whitelists allow you to target only the Supply IDs or the Site IDs listed. Through Blacklists, you can exclude specific Supply IDs or Site IDs in the same way - similar to advanced targeting options, our recommendation is to start your campaigns without any WL/BL and use them after optimising, once you know which zones are providing you with the highest performances or the lowest ones.
Take a look at some insights regarding Whitelists and Blacklists here.
12. Bid & Budget
We provide an updated list of Average CPC for each Geo, by format and device. We recommend that you start there and then experiment by up bidding and down bidding until you get a win rate of 40-50%. Next, set your daily budget. We recommend that you ask your account manager especially if this is your first campaign with Pushground.
Learn more about Bidding Strategies here.
13. Creativity Set Up
Creating your creatives is one of the most important steps in a successful campaign. You should make at least 2 or 3 different variations of your notification in each campaign. This allows you to attract different types of users and perform A/B testing which will help you optimise ads and increase your CTR. To ensure there are no problems with how your image appears in your ad, be sure to see the specifications.
ProTip: Change your creatives every 5 days for the best performance.
14. Automatic Rules
Automatic Rules are custom relations that allow you to control your performance and spend. They’re an easy way to have a little bit more control on your campaigns, so it’s an early optimization tool! Make sure to check them and test different strategies. In this article, you can check how to strategically apply them to your campaigns for a better ROI.
Before saving your campaign, check the Campaign Summary on the right side of your screen. It will show your campaign potential reach, taking into consideration the chosen targeting options. The more you narrow your campaign, the less traffic you’ll reach.

You're now ready to set the campaign status to active! Then hit save to launch your campaign. Set to paused to save your work without starting the campaign.
Your campaign will be either approved or not based on the Creative restrictions. If everything checks out, your ads will start being sent out 1-2 minutes after your hit save.
It is that simple! We recommend that you spend fast but optimise faster.
Good luck!
.png)
.png)